
Hunting for a way to jazz up your wall artwork? Try out earning your very own Do-it-yourself acrylic frames for personalized 3D artwork. This put up will stroll you by means of accurately how I built these in my house.
If you are hunting for a custom made way to frame your photographs or artwork to make it stand out from the wall, these Do-it-yourself acrylic frames are the ideal issue.
I landed on these frames due to the fact I necessary a very little anything to insert a minimal further pizzazz to my bathroom wall. 
We made a decision to incorporate my partner&rsquos enjoy of golf into the combine by printing photos he took of PGA golf courses he&rsquos performed in black and white.
I love when art is a conversation piece, so this was the best addition to the bathroom wall.
To make it certainly stand out, I made these Do it yourself acrylic frames for every single of the pics.
In this article are the steps I took&hellip 
Table OF CONTENTS
- one. Assemble your products.
- two. Tape each and every side of each corner.
- three. Mark the place you want to drill your holes.
- 4. Drill your holes.
- five. Use my review here to protected your pics to the body.
- 6. Mark the full on the wall where by you strategy to hold it.
- 7. Use your punch resource to mark the entire on the wall.
- eight. Drill your holes in the wall.
- nine. Screw the standoffs into the wall.
- ten. Connect your frame to the standoffs.
- eleven. Revel in the finished product!
Disclaimer: This submit does incorporate affiliate back links for your ease. This is at NO more expense to you but earns me a small commission. To browse more, check out our disclosure plan.
one. Obtain YOUR Resources.
First items to start with, collect all your components. All resources for everything I made use of are joined below. I also involved a listing with inbound links of what we utilised to hold the frames, far too. 
FOR Generating THE Diy ACRYLIC FRAMES:
- Plexiglass/Acrylic Sheets
- Standoffs
- Glue Dots
- Piece of Lined Paper
- Drill 
- Drill Bits (just one for the dimensions of the opening of your standoffs and one for the screw for the wall)
- Painter&rsquos Tape
- Ruler
- Marking Tool (I utilized a Sharpie)
FOR HANGING THE Diy ACRYLIC FRAMES:
- Pencil
- Handheld Stage
- Punch
- Screwdriver
2. TAPE Every Side OF Every single CORNER.
Plexiglass/acrylic is really fragile.
Because of this, you have to be pretty mindful when you are drilling the holes.
Placing a piece of painter&rsquos tape on both aspect exactly where you program to drill your hole will assistance keep the acrylic sheet from breaking or cracking when you drill.
I also kept the protecting cover on each facet of the piece, way too.
three. MARK Where by YOU WANT TO DRILL YOUR HOLES.
When you have positioned the painter&rsquos tape on all four sides (or nonetheless many areas you plan to drill a hole), you can place a mark of where by you want to drill your gap.
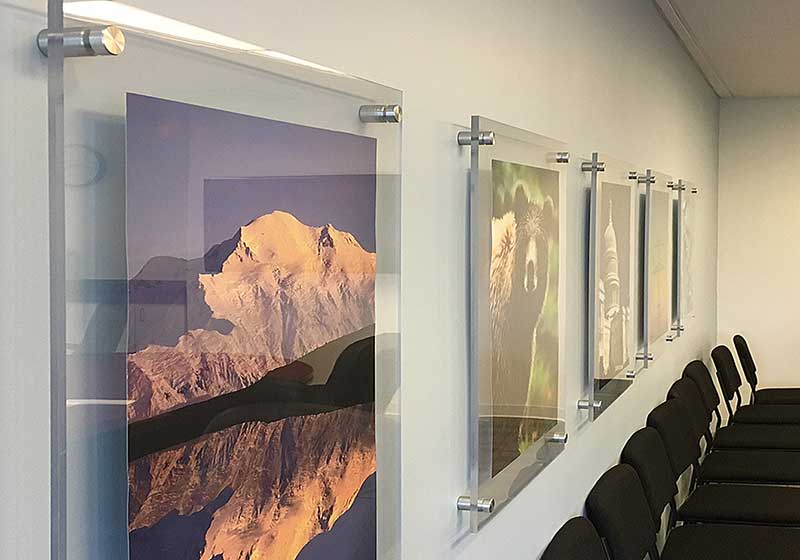
I drilled my holes 1&Key in from each edge as you can see from the picture higher than.
4. DRILL YOUR HOLES.
Before really drilling, double and triple verify that your marks are degree both equally horizontally and vertically.
You&rsquoll want to have these level for when you hold them. 
The drill bit you pick out should be massive adequate to let the standoff to fit within the gap.
I would do a examination operate on a piece of scrap substance to make sure it is significant ample. 
After you are certain that the marking are degree and the little bit is large more than enough, you want to start off drilling.
Below is a fantastic video to comply with if you would like a demonstration on how to drill by acrylic.
You want to use about 50 % energy when you are drilling.
Slow and constant. If you go to rapid, the acrylic will crack, so acquire your time.
As you drill you really should see spirals of the acrylic little by little getting taken out. 
Repeat the drilling for every gap you have to have.
5. USE YOUR GLUE DOTS TO Safe YOUR Photos TO THE Frame.
The moment your holes are created, you can increase your picture to the piece of acrylic/frame.
The key below is to all over again, make positive your picture is stage ahead of you completely safe it to the frame.
The glue dots are incredibly sticky and don&rsquot allow for for a great deal of wiggle area, so it may be a superior thought to line up a piece of lined paper driving the body to assist you line the edges of your picture.
No matter what trick will work for you to make certain the picture gets glued to the frame level will do. 
6. MARK THE Total ON THE WALL In which YOU Prepare TO Hold IT.
As you commence to hang, mark your holes on the wall, but make sure your frame is level.
If you measured effectively in the step in advance of drilling, the holes on your body ought to currently be stage.
If you are hanging additional than one particular frame like I did, make positive every frame is amount in your grid, way too. 
7. USE YOUR PUNCH Device TO MARK THE Total ON THE WALL.
I enjoy this software so significantly since it gets your gap began and allows your drill to keep in put when you commence drilling.
If you don&rsquot have a single, I highly suggest it!
eight. DRILL YOUR HOLES IN THE WALL.
Be positive to use a bit that matches the screws that came together with your standoffs.
This will most very likely be a more compact little bit than the a person you used on the frames.
I also applied a stud finder to see if I wanted drywall anchors, but mainly because these frames are not that major, you could likely do without them.
nine. SCREW THE STANDOFFS INTO THE WALL.
Once you acquire your standoffs, you&rsquoll see how they work.
In order for the image to &ldquostand off&rdquo the wall, you have to safe the standoff with the provided screw in advance of attaching the photo to the standoffs.
As you can see from the image, producing certain all the things is amount and measured appropriately is super critical. 
ten. Connect YOUR Body TO THE STANDOFFS.
As soon as you&rsquove connected the standoffs, it&rsquos time to connect the pictures!
Line up the standoffs with your drilled holes and safe the standoffs.
If all goes nicely, almost everything will line up appropriately and be all set to go!
If you are like my dad and I, you&rsquoll arrive throughout at minimum one that doesn&rsquot line up flawlessly.
For this, we cheated a minimal little bit and secured the standoff to the frame and used a glue dot to safe it to the wall, so it didn&rsquot move.
We only experienced to do this for two corners of two frames, but don&rsquot fear if you mess up a person&hellip We&rsquove been there! 
11. REVEL IN THE Concluded Item!
Now it&rsquos time to enjoy your operate!
We did a grid of 9 complete pictures which was a huge enterprise with all the measuring, but I&rsquom in like with how it turned out.
Allow me know in the reviews what you feel of the completed product or service!